This exact same guide is also available on the Empire Minecraft forums: [Guide] Maximizing Performance with Fabric [1.17.x] | Empire Minecraft
This is a beginner’s guide to maximizing your client-side performance on Quilt. You probably already know a good amount of the stuff in here – but this is meant to be a reference guide for others who don’t.
If your frames per second (FPS) is lower than you want it to be, I can help.
Even if your system is unable to get a full 60 FPS, you can still get pretty close with these changes/additions! To see what they did to a test system of mine, open the spoiler.
Frame Tests!
Throughout this process, I will be comparing the number of frames I get on my system.
Conditions
This is a Dell Precision M6600, with an Intel Core i7-2820QM, an AMD FirePro M6100 GPU, and 20 GB of memory. Full hardware and software info at HW probe of Dell Precision M6600 #3c06ad8f67.
The only apps running in the background will be Kate, Discord, and VLC playing Meat Loaf’s full Bat Out of Hell album.
The testing world is a Creative/Normal Mode singleplayer world. I will be standing stationary at the spawn point.
Daylight cycle is off and time is set to midnight, to allow mobs to be a variable.
The Minecraft installation is completely new.
Video settings will be default.
The MC window is 1920x1010 (windowed).
There is no FPS cap, and VSync is off.
TEST 2: Vanilla 1.17.1; 4GB allocated; using new JVM flags
FPS fluctuates between 40 and 65, with an average of 50.
TEST 3: Fabric 1.17.1; 4GB allocated; using new JVM flags; Sodium, Lithium, Starlight, and Hydrogen installed
FPS fluctuates between 80 and 130, with an average of 110.
TEST 4: Fabric 1.17.1; Same conditions as test 3 but with my modpack
FPS fluctuates between 75 and 120, with an average of 95.
(tl;dr of "Frame Tests: these optimisations made my framerate go from 50 to 110.)
So what did waffle do to get from 50 FPS to over 110?!
Well, the answer is that everything is in the settings that you use, and what you have installed. Remember: the hardware in these tests did not change at all; only the settings and the software.
STEP 1: Allocating more memory
One of the things that Minecraft (and Java applications in general) relies on is memory. This is where everything that the game is using right now is stored.
Minecraft generally runs better if you give it more memory (not always but usually). The amount of memory you can use is completely dependent upon how much physical memory is in your system.
To figure out how much memory your system has:
- Windows: Taskbar search > input System Information and scroll down to “Installed Physical Memory (RAM)”
- macOS: Click the Apple logo in the top left and click “About this Mac”. It’s listed under Memory.
- Linux: You probably already know how much you have.
This will generally be about 4 to 16GB, depending on your system, but can be higher or lower.
I recommend using 1 to 4GB of memory. If you have more than 8GB, allocate 4GB, and if you have less than 8GB, take your memory amount and half it. Do not allocate more memory than you have physically in your system.
To allocate this amount of memory to Minecraft, go into your game instance’s “JVM Arguments”. This varies depending on your launcher, but for the default launcher is in your instance’s settings. The first two flags have the following arguments:
“-Xmx2G -Xms1G”
Xmx is your maximum memory allocated to Minecraft, and your minimum memory is Xms. Modify the maximum (first flag) to have what you calculated earlier; e.g., I would use “-Xmx4G”.
As for the minimum (second flag), you can set this anywhere between half of your maximum to the maximum (e.g. I could use “-Xmx2G”).
Once that’s saved, you now have more memory than you would by default! To ensure that you’ve configured it correctly, start up Minecraft and press Alt + Shift + F3. This will bring up a menu that’s more detailed than normal F3. In the top-right, it should say something along these lines:

“Mem” should be out of the “Xmx” amount (times 1024). If that’s correct, you’ve done it right! Congrats!
STEP 2: Installing Sodium & friends
If you haven’t already, you should install the Quilt Loader. You can see instructions on how to do that in the official guide.
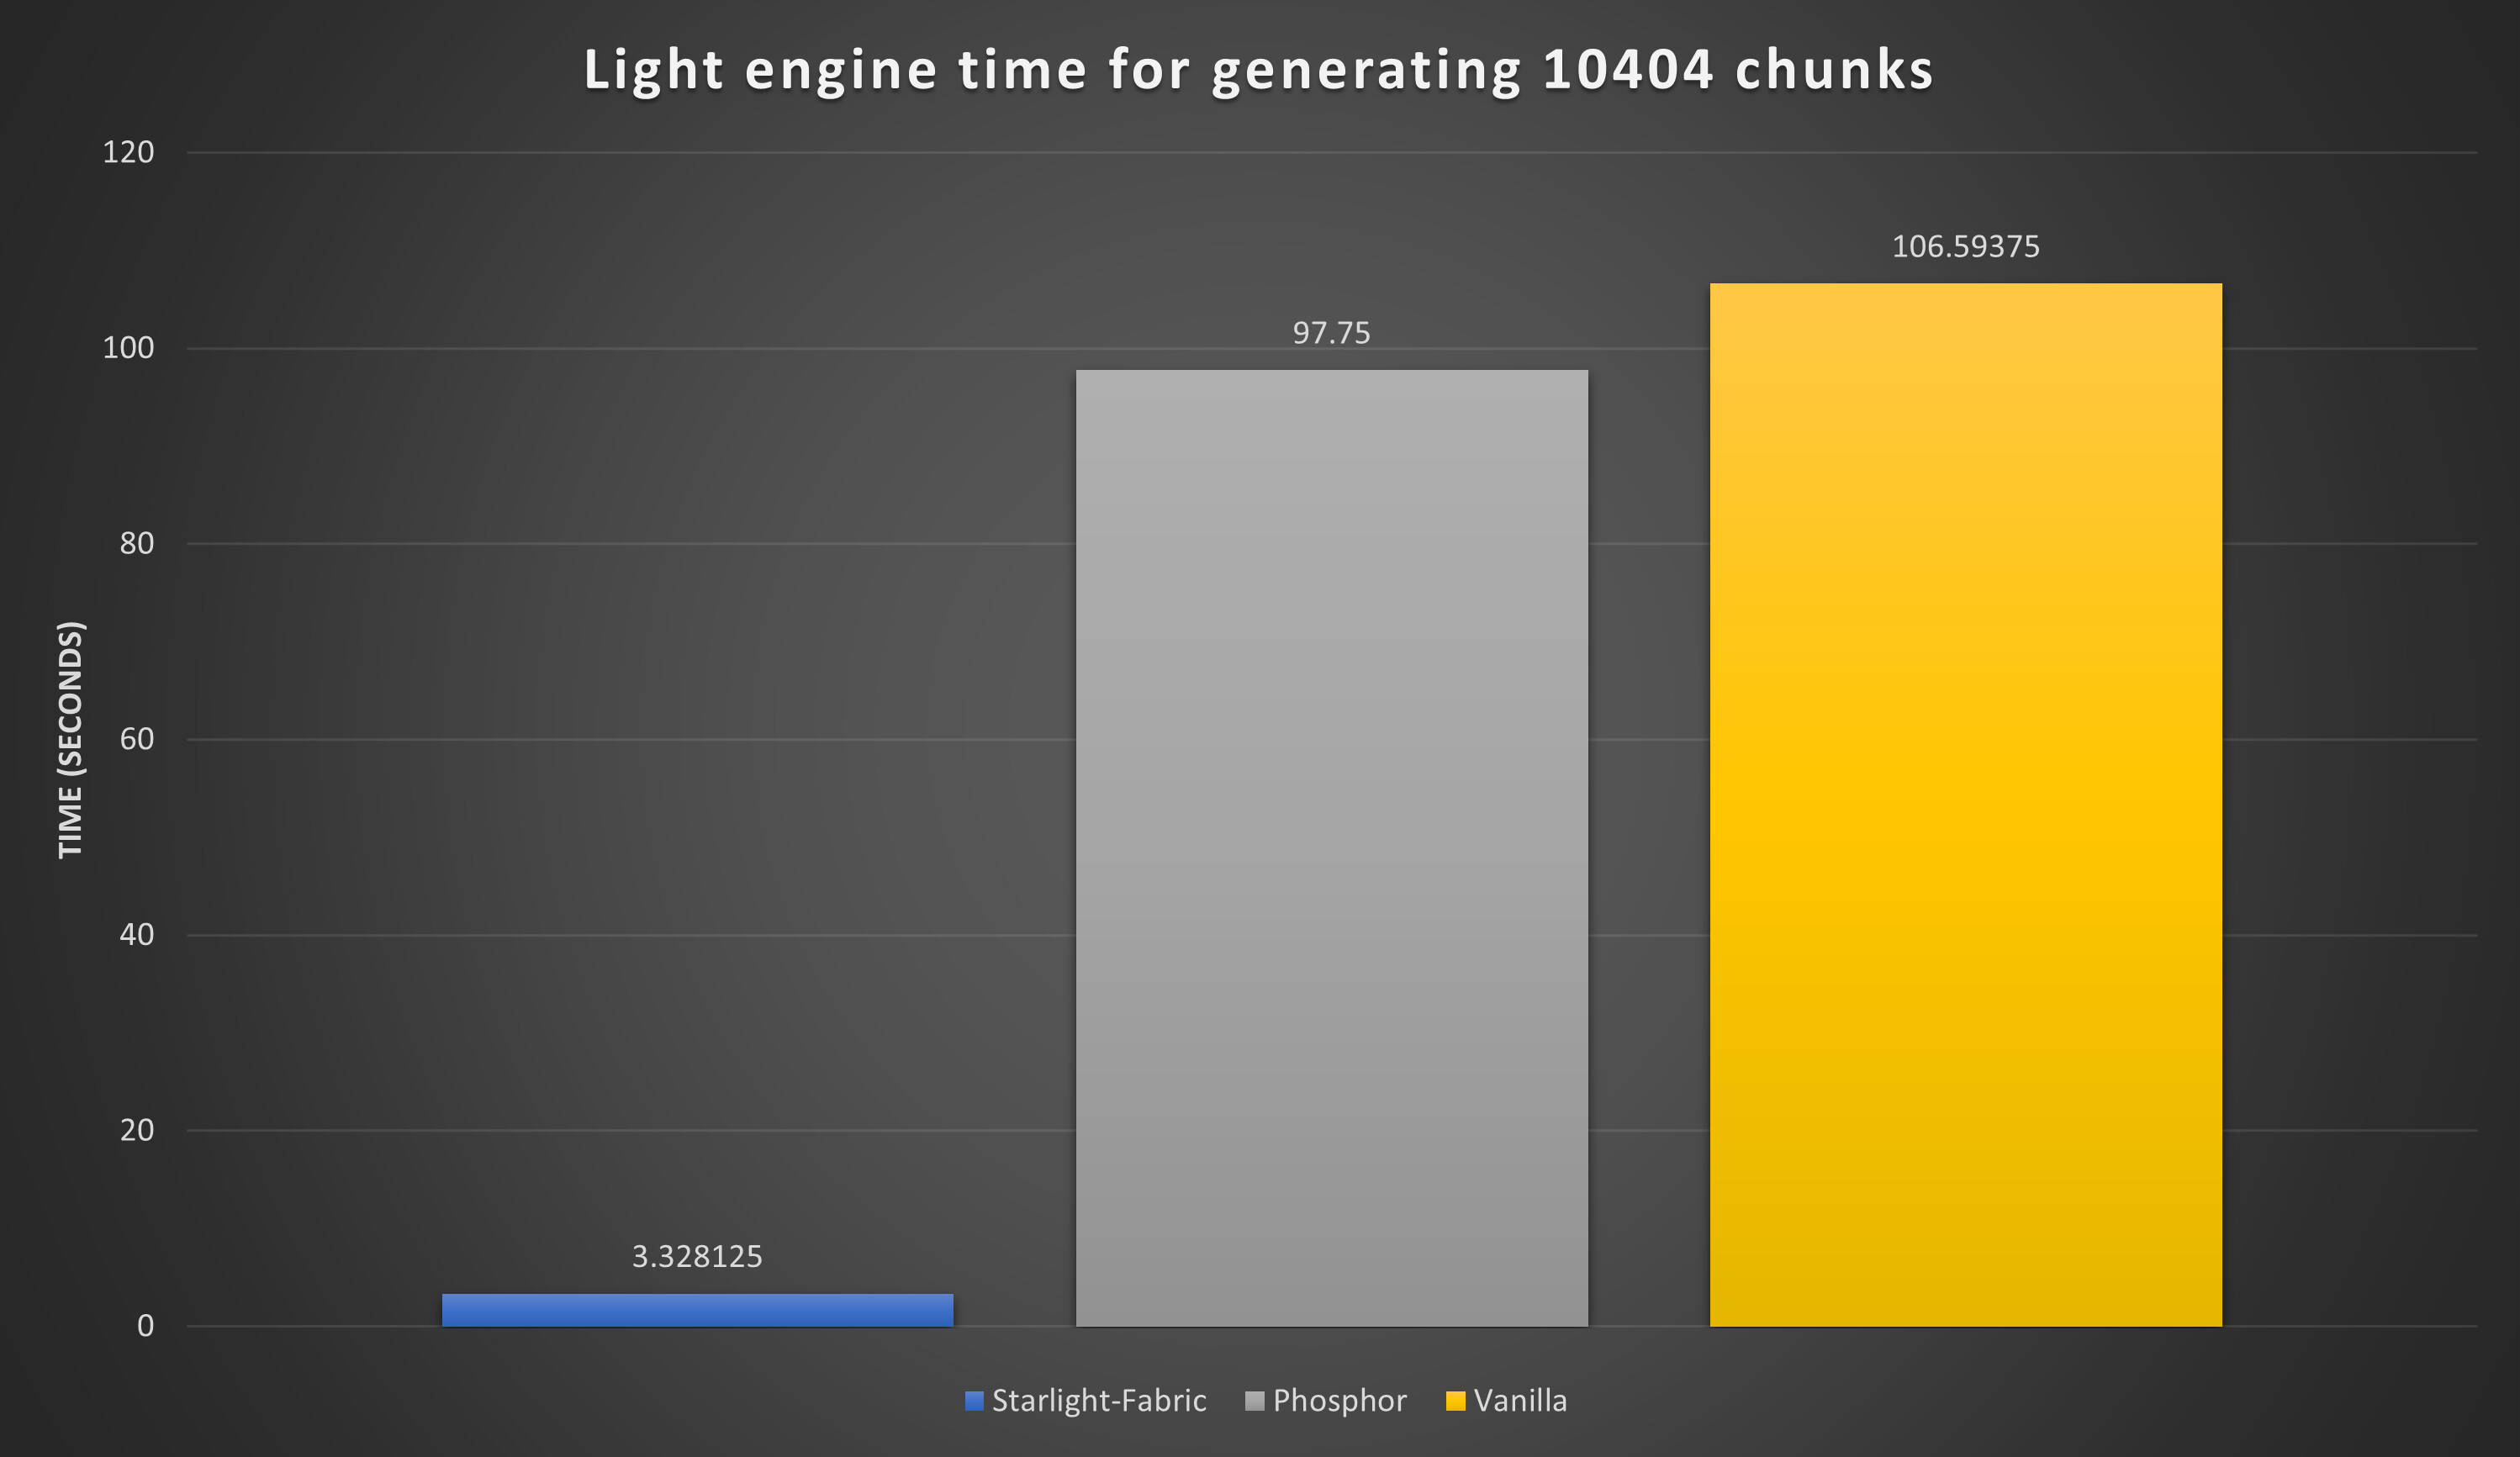
The next step is to install performance-enhancing mods. Personally, the ones I recommend the most are Sodium, Lithium, Starlight, FerriteCore, and EBE. These five mods all target certain aspects of the game and optimise them. Place those into your mods folder.
Are you using OptiFine? See why you shouldn’t.
STEP 3: Tweaking video settings
The third step to optimising your Minecraft: change around your in-game settings!
All of your progress is going to be for nothing if your render distance is 32 and your biome blend is 9. ![]()
Go into the ESC menu > Options… > Video Settings.
My personal recommendation is to lower the settings that impact performance to the lowest they can go, and gradually increase them one-by-one and see how they affect your FPS.
As for VSync and FPS Limit: I personally recommend turning off VSync, and turning on FPS limit, to whatever your monitor’s refresh rate is (usually 60 Hz [FPS]). This allows your FPS to reach its highest potential, without hogging up all your computer’s resources.
Turn VSync back on only if you’re having issues with screen tearing.
STEP 4: Closing other applications
This one seems obvious, but it needs a mention. If you’re still having issues, you might have some unnecessary applications running in the background. Try opening Task Manager / System Monitor and closing apps that take up a lot of memory and CPU usage.
Just be careful not to close things that are integral to your system running! (cough cough don’t end System, kernel_task, systemd, etc., I’ve made those mistakes before so that you don’t have to ![]() )
)
It also may be worthwhile, if your computer is the lowest of the low, to switch to a whole other operating system entirely. Windows isn’t known for being the most resource-efficient, so either run Windows10Debloater, or maybe even put a bit of research into Linux and find a distro that works for you (I recommend Pop!_OS for beginners). ![]()
You’re now complete! Share how much your FPS increased by replying below, I’d love to see if/how much this guide has helped! ![]()
If anyone has any other optimisations they’d like to share, feel free to, I might add them to this guide! ![]()